Pages

Wednesday, November 19, 2014

How to: Show Line Number in SQL Server Management Studio

Have you ever met the following scenarios: 1) when you write a very complex ad-hoc query in SQL Server Management Studio (SSMS), you need to count the total columns that have been derived. 2) You even need to refer to the line that appears in the error message. If yes, you need to enable the option of showing line numbers in SSMS. In fact it is very simple. It can be done in a minute. You just need to know to click the right button. Be cautious that it is different for SQL Server 2008 (2008R2) and SQL Server 2012.

Solution

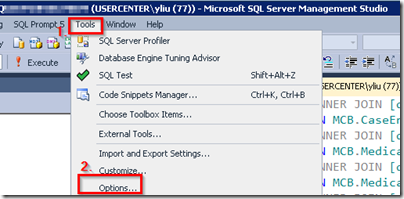
Step 1: In SSMS, select Tools tab then Options as shown below

showLineNumber0

Step 2: In Option Popup Windows, expand “Text Editor

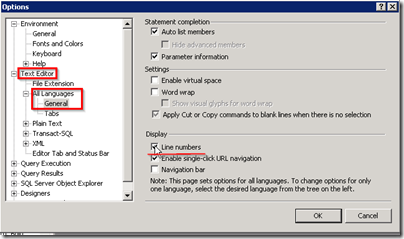
a. For SQL Server 2008 and SQL Server 2008R2, you need to choose “All Languages”. Under General page, check the box for Line Number.

showLineNumber2008R2

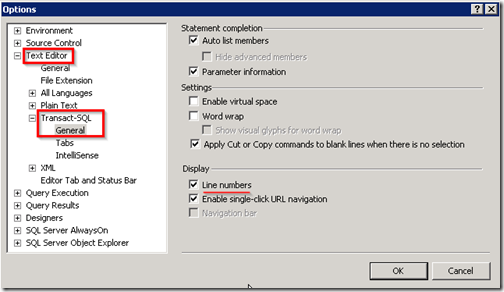
b. For SQL Server 2012, you need to choose “Transact-SQL”. Under General page, check the box for Line Number.

showLineNumber

Hope this tip will help you improve your coding efficiency. If you just want to jump to some specific line in SSMS quickly, you can use CTRL+G hot key.
Monday, June 30, 2014

Difference Between COALESCE and ISNULL

ISNULL is a T-SQL function to replace NULL values as COALESCE does. At some cases these two functions get the same results but there are some differences. Below is a summary of their differences and I hope that it will help you decide which function to use when you need to determine the one with better performance or better concurrency control.


COALESCE ISNULL
Standard ANSI SQL? Yes No (Only for T-SQL)
Numbers of Parameters Two or more parameters. Two parameters only.
Data type determination of the resulting expression Determined by the data type of parameters with the highest precedence Determined by data type of the first parameter
Allow both inputs to be untyped NULLs?
No. For SELECT COALESCE(NULL, NULL); , it will return an error. You need to have at least one of the null values be a typed NULL. 

SELECT COALESCE(CAST(NULL AS INT), NULL);

Yes. For SELECT ISNULL(NULL, NULL); it will return a NULL typed as an integer.
NULLability of the resulting expression Considered to be NULL with non-null parameters. Always considered NOT NULLable
Working with subquery as input parameters When executing COALESCE((subquery), 1), the subquery is evaluated twice.  you can get different results depending on the isolation level of the query. Evaluated only once.

Monday, June 16, 2014

How to: Create Hierarchies in PowerPivot for Excel 2013

Just like hierarchies in SSAS, hierarchies in PowerPivot for Excel 2013 provides a very convenient way to let you group data through different layers. Today we will use date dimension to demonstrate how to create hierarchies in PowerPivot.

First of all, you need to be in the Diagram View of the PowerPivot Window. Click Diagram View button under Home Tab.

diagramView

Create Hierarchies

Select the table you would like to build hierarchies in. Here we choose DimDate table. Then click the “Create Hierarchies” button on the upper right corner of the table. After renaming the hierarchy you can drag the fields from the table down to the hierarchy that was just created. An alternative is to select a column first and then right click the column > Create Hierarchies.

CreateHierarchy

Add Hierarchies

Right click the column that you would like to add to a hierarchy. A column can only be in one hierarchy. If a column already exists in a hierarchy, there won’t have an option to “Add to Hierarchy”.

addHierarchy

If you would like to add a column from another table, you need to use RELATED DAX function to add columns from one table to another table. Before you can add columns, you must create a relationship between these tables.

Adjust Hierarchy Levels

If you would like to adjust the levels between hierarchies, right click any one and move up or down, or remove.

adjustHierarchy

After hierarchies are created, you can directly drag it to PivotTable Fields just as columns.

HierarchyInPivot

Monday, June 2, 2014

How to: Enable PowerPivot Add-ins for Excel 2013

Power Pivot in Microsoft Excel 2013 is a build-in add-in you can use to perform powerful data manipulation and analysis in Excel 2013. However, it is hidden somewhere and you have to enable it first before using it.

Here are steps to dig it out:

  1. Go to File > Options > Add-Ins.

    Step1Option

  2. Change In the Manage box, click COM Add-ins from the drop down list and click Go. Note that the default is Excel Add-ins.

    Step2Addin

  3. Check Microsoft Office Power Pivot in Microsoft Excel 2013 box > OK. You can check Power View and Power Query in similar way as you can see they are also listed in the COM Add-ins list.

    Step3Check

  4. Bingo! You are ready to use Power Pivot for Excel 2013! PowerPivot tab should appear in your ribbon as shown below: 

    Step4Result

Friday, May 30, 2014

How to: Extract only Date Part From DateTime

It is common practice to extract only date part from datetime format, such as for a datetime of 2014-05-30 15:31:58.860, only 2014-05-30 is returned. Today we will show three main methods to choose from.

Method 1:

SELECT convert(DATE, GETDATE() )

Method 2:


SELECT CONVERT(VARCHAR(10),GETDATE(),126)

Method 3:


SELECT DATEADD(D, 0, DATEDIFF(D, 0, GETDATE()))

will mask the time part as 00:00:00.000.  It sometimes is regarded as better performance here.

Tuesday, March 18, 2014

SSIS's BULK insert error msg

Problem

When you are trying Bulk insert from csv file, here is the error message you may run into:

“Could not bulk insert because file 'C:csv_filename.txt' could not be opened. Operating system error code 3(The system cannot find the path specified.).”

Solution

First of all, confirm that you are specifying the UNC (Universal Naming Convention) path and not just drive letters. If you are trying to create the file to a remote location then the path should follow UNC, i.e:

             \\Server_Name or IP_ADDRESS\Shared_Folder_PATH(Name)\FILE_NAME

Note that the path may be OK if you are trying to create the file on the SAME server running SQL Server.

Secondly, make sure that the SQL Server service account has permissions to SQL Server instance.
For doing this you can use a Domain user or, create a new local user and start the services with that account.
Go to the lower left corner of the desktop, click START, input “services.msc”, then choose “SQL Server” as shown below:

bulkInsertService
Check Log On AS, a new window will pop up.

bulkInsertServiceLogon
The default setting is Local System account. Try changing it with a domain user account and restart SQL Server Service after new changes.

Last but not least, make sure that this account has Read and Write permissions on the folder where you are creating the file. To do so, right click on the folder --> sharing and security --> permissions.

That’s it! Now the error message should have been swept away.

Sunday, March 16, 2014

SSAS error msg: Unable to retrieve data mining algorithms

Problem

When you tried to create a new mining structure in SSAS, you may notice a warning message appears in the window as shown below:

ErrorMsgSetup_thumb1

Unable to retrieve a list of supported data mining algorithms. Make sure you are connected to the correct Analysis Services server instance and the Analysis Services server named localhost is running and configured properly. You can continue with a default list of data mining algorithms.”

Solution:

Step 1: Check Analysis Service has been started from SQL Server Configuration Manager.

SSAS_serviceStarted_thumb2

Step 2: Check the deployment property to make sure that it has been set up correctly.

SSAS_deployServer_thumb2